Developer Guide
- Acknowledgements
- Setting up, getting started
- Design
- Implementation
- Documentation, logging, testing, configuration, dev-ops
- Appendix: Requirements
-
Appendix: Instructions for manual testing
- Launch and shutdown
- Adding a patient
- Deleting a patient
- Booking an appointment
- Cancelling an appointment
- Editing existing patients
- Editing existing appointments
- Marking appointments as complete
- Marking appointments as incomplete
- Listing results
- Grouping/Ungrouping results
- Hiding/Unhiding results
- Finding results
- Dealing with save data issues
- Appendix: Effort
Acknowledgements
- In order to change the contents page for User Guide and Developer Guide to follow numbering order, we reused code from https://github.com/lesterong/tp/blob/master/docs/assets/css/style.scss with minor modifications.
- We have reused code from https://github.com/AY2122S2-CS2103T-W09-2/tp/blob/master/src/main/resources/view/Caramel.css and https://github.com/AY2122S2-CS2103T-W09-2/tp/blob/master/src/main/resources/view/Cinnamon.css for styling our User Interface (UI).
Setting up, getting started
Refer to the guide Setting up and getting started.
Design
.puml files used to create diagrams in this document can be found in the diagrams folder. Refer to the PlantUML Tutorial at se-edu/guides to learn how to create and edit diagrams.
Architecture
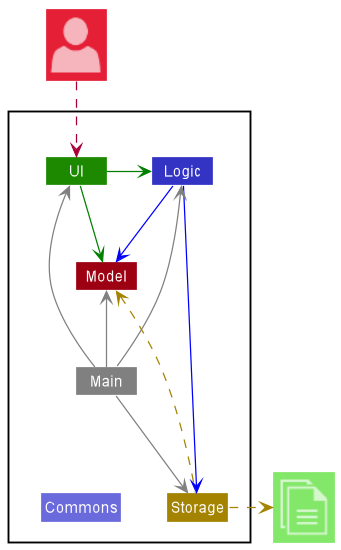
The Architecture Diagram given above explains the high-level design of the App.
Given below is a quick overview of main components and how they interact with each other.
Main components of the architecture
Main has two classes called Main and MainApp. It is responsible for,
- At app launch: Initializes the components in the correct sequence, and connects them up with each other.
- At shut down: Shuts down the components and invokes cleanup methods where necessary.
Commons represents a collection of classes used by multiple other components.
The rest of the App consists of four components.
-
UI: The UI of the App. -
Logic: The command executor. -
Model: Holds the data of the App in memory. -
Storage: Reads data from, and writes data to, the hard disk.
How the architecture components interact with each other
The Sequence Diagram below shows how the components interact with each other for the scenario where the user issues the command delete 1.
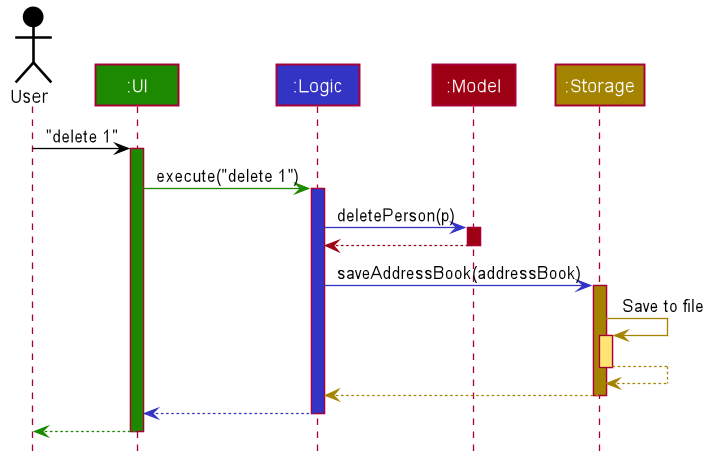
Each of the four main components (also shown in the diagram above),
- defines its API in an
interfacewith the same name as the Component. - implements its functionality using a concrete
{Component Name}Managerclass (which follows the corresponding APIinterfacementioned in the previous point.
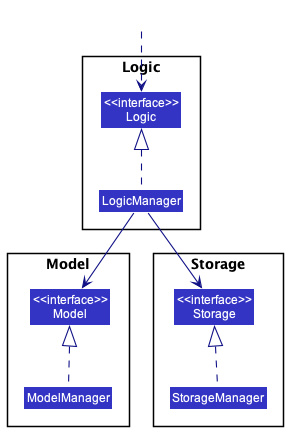
For example, the Logic component defines its API in the Logic.java interface and implements its functionality using the LogicManager.java class which follows the Logic interface. Other components interact with a given component through its interface rather than the concrete class (reason: to prevent outside component’s being coupled to the implementation of a component), as illustrated in the (partial) class diagram below.
The sections below give more details of each component.
UI component
The API of this component is specified in Ui.java
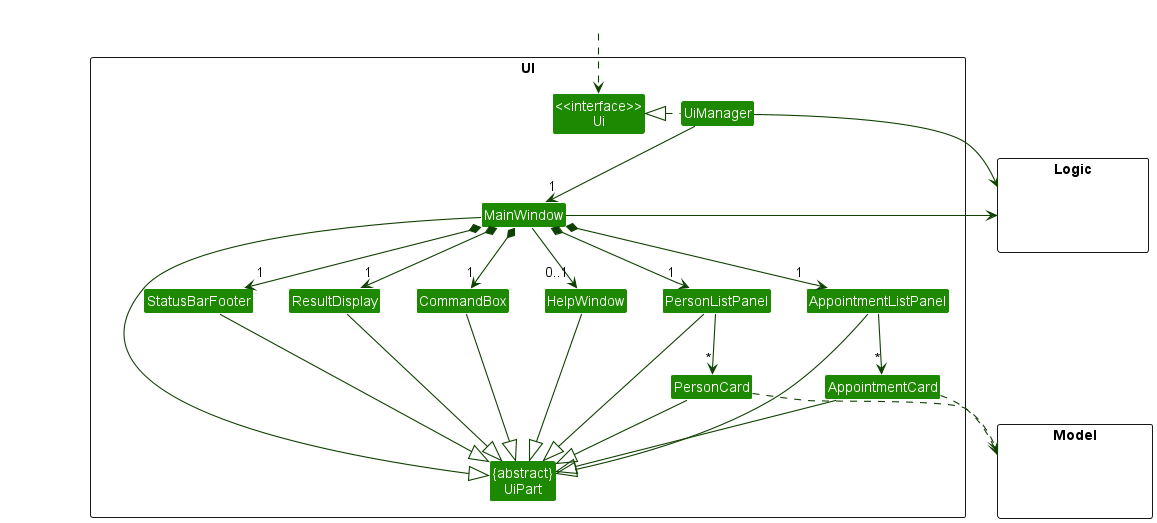
The UI consists of a MainWindow that is made up of parts e.g.CommandBox, ResultDisplay, PersonListPanel, StatusBarFooter etc. All these, including the MainWindow, inherit from the abstract UiPart class which captures the commonalities between classes that represent parts of the visible GUI.
The UI component uses the JavaFx UI framework. The layout of these UI parts are defined in matching .fxml files that are in the src/main/resources/view folder. For example, the layout of the MainWindow is specified in MainWindow.fxml
The UI component,
- executes user commands using the
Logiccomponent. - listens for changes to
Modeldata so that the UI can be updated with the modified data. - keeps a reference to the
Logiccomponent, because theUIrelies on theLogicto execute commands. - depends on some classes in the
Modelcomponent, as it displaysPersonandAppointmentobjects residing in theModel.
Logic component
API : Logic.java
Here’s a (partial) class diagram of the Logic component:
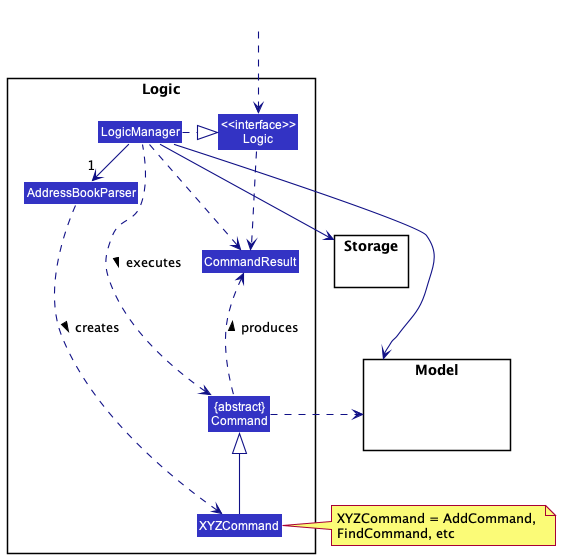
How the Logic component works:
- When
Logicis called upon to execute a command, it uses theAddressBookParserclass to parse the user command. - This results in a
Commandobject (more precisely, an object of one of its subclasses e.g.,AddCommand) which is executed by theLogicManager. - The command can communicate with the
Modelwhen it is executed (e.g. to add a person). - The result of the command execution is encapsulated as a
CommandResultobject which is returned back fromLogic.
The Sequence Diagram below illustrates the interactions within the Logic component for the execute("delete 1") API call.
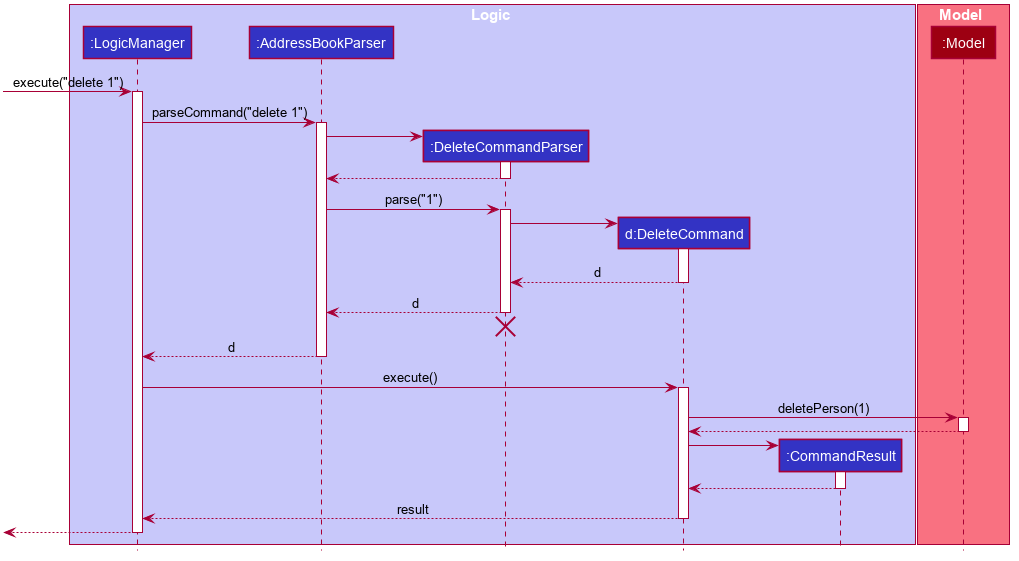
DeleteCommandParser should end at the destroy marker (X) but due to a limitation of PlantUML, the lifeline reaches the end of diagram.
Here are the other classes in Logic (omitted from the class diagram above) that are used for parsing a user command:
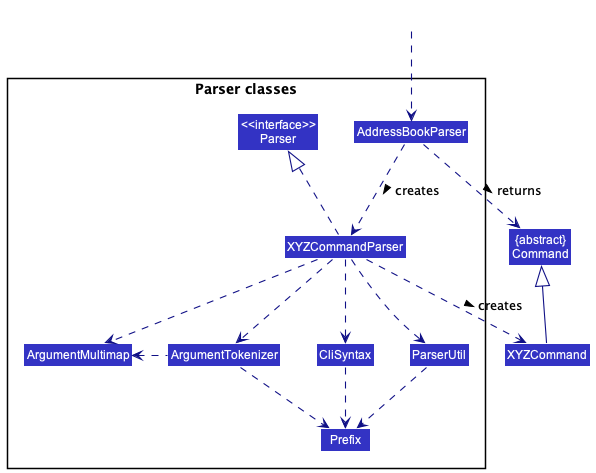
How the parsing works:
- When called upon to parse a user command, the
AddressBookParserclass creates anXYZCommandParser(XYZis a placeholder for the specific command name e.g.,AddCommandParser) which uses the other classes shown above to parse the user command and create aXYZCommandobject (e.g.,AddCommand) which theAddressBookParserreturns back as aCommandobject. - All
XYZCommandParserclasses (e.g.,AddCommandParser,DeleteCommandParser, …) inherit from theParserinterface so that they can be treated similarly where possible e.g, during testing.
Model component
API : Model.java
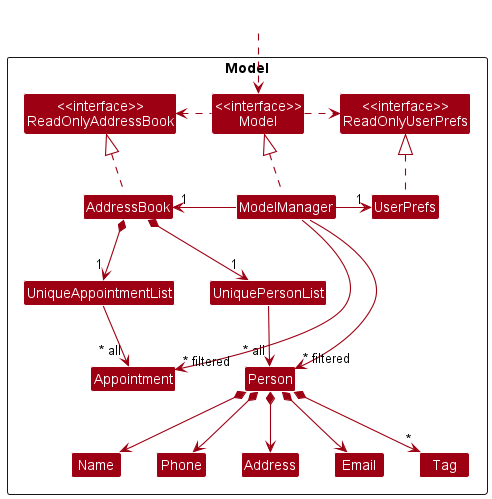
The Model component,
- stores the address book data i.e., all
Personobjects (which are contained in aUniquePersonListobject) and allAppointmentobjects (which are contained in aUniqueAppointmentListobject). - stores the currently ‘selected’
Personobjects andAppointmentobjects (e.g., results of a search query) as separate filtered lists which are exposed to outsiders as an unmodifiableObservableList<Person>andObservableList<Appointment>respectively that can be ‘observed’ e.g. the UI can be bound to these lists so that the UI automatically updates when the data in the lists change. - stores a
UserPrefobject that represents the user’s preferences. This is exposed to the outside as aReadOnlyUserPrefobjects. - does not depend on any of the other three components (as the
Modelrepresents data entities of the domain, they should make sense on their own without depending on other components)
Tag list in the AddressBook, which Person references. This allows AddressBook to only require one Tag object per unique tag, instead of each Person needing their own Tag objects.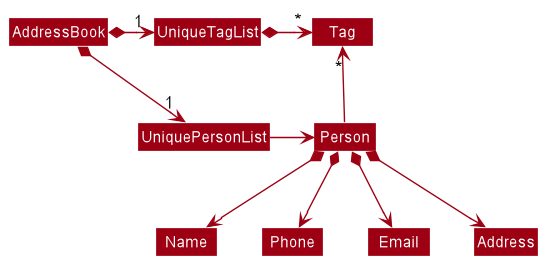
Storage component
API : Storage.java
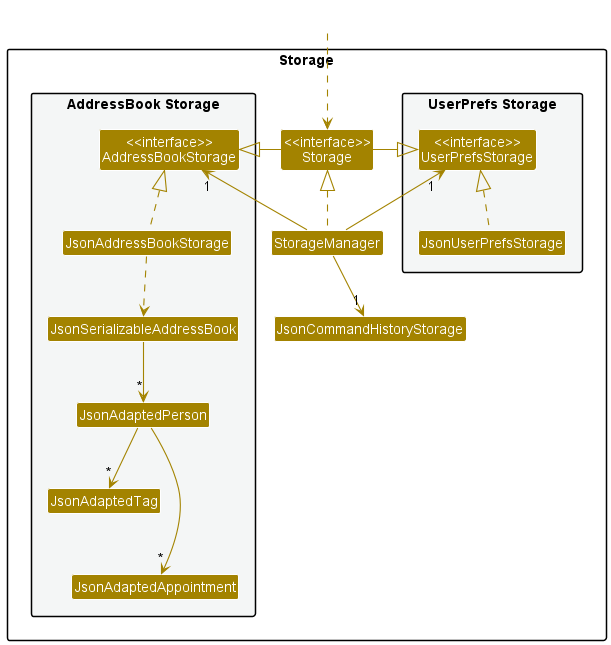
The Storage component,
- can save idENTify data, command history data and user preference data in json format, and read them back into corresponding objects.
- inherits from both
AddressBookStorageandUserPrefStorage, which means it can be treated as either one (if only the functionality of only one is needed). - depends on some classes in the
Modelcomponent (because theStoragecomponent’s job is to save/retrieve objects that belong to theModel)
Common classes
Classes used by multiple components are in the seedu.addressbook.commons package.
Implementation
This section describes some noteworthy details on how certain features are implemented.
List Feature
Implementation
The list patients/appointments mechanism is facilitated by the UniquePersonList and UniqueAppointmentList
respectively. They extend Iterable and store lists of Person and Appointment.
An example usage scenario of list patients/appointments is given below:
Steps:
-
After launching the application, user executes the command
find alexto search for entries in bothUniquePersonListandUniqueAppointmentListthat contains “alex”. This causes entries in the list which does not contain “alex” to be hidden from the GUI. This will set the premise of usinglist patientsandlist appts. -
When user wants to view the full list of patients again, he/she can enter the command
list patients. Note that this command only interacts with theUniquePersonListand not theUniqueAppointmentList, thus it will not modify the displayed list of appointments in any way. -
When user wants to view the full list of appointments again, he/she can enter the command
list appts. Note that this command only interacts with theUniqueAppointmentListand not theUniquePersonList, thus it will not modify the displayed list of patients in any way. -
When user wants to view the full lists of both patients and appointments again, he/she can enter the command
list all.
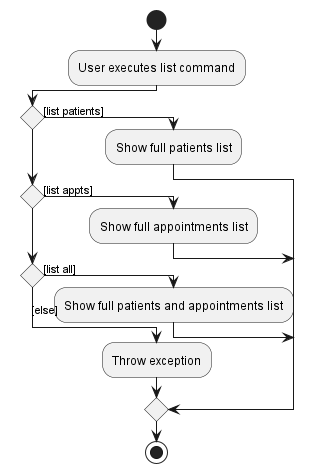
The activity diagram below summarises the above points.
To help you understand what is going on behind the scenes, here is a sequence diagram that demonstrates how
list patients work:
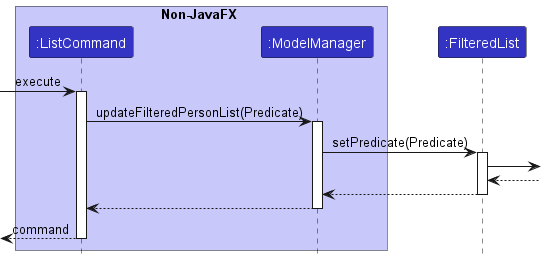
From the diagram, the ListCommand object passes the predicate to show all entries to the ModelManager, which
will call onto a JavaFX function to modify the displayed list.
For list appts, it follows a similar
process as well, but with updateFilteredAppointmentList() instead. For list all, you can think of the
behaviour as executing both list patients and list appts.
Design considerations
Aspect: How the command is implemented:
-
Alternative 1 (current choice):
list patients,list apptsandlist allas a command wordlistwith 3 different descriptors which are not considered as arguments.- Pros: No additional parser class required
- Cons:
ListCommand#execute()will have more lines of code.
-
Alternative 2:
listas a command word with argumentspatients/appts/allfollowing it.- Pros: Seems more aligned with other commands that require more than 1 word of input
- Cons: Require an additional
ListCommandParserto work; more lines of code required.
We ultimately went with Alternative 1 since we do not expect list to take in many different arguments.
Cancel Feature
Implementation
The implemented cancel feature allows users to cancel a patient’s appointment based on its index in the appointment list.
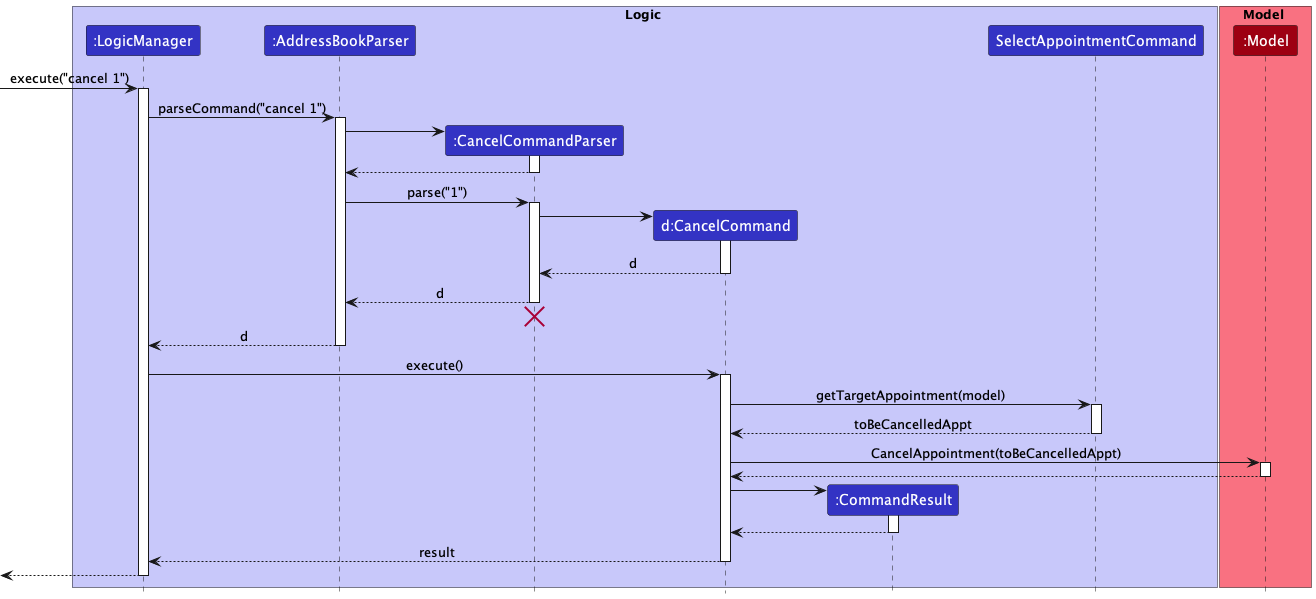
It is implemented similar to other idENTify commands and it extends SelectAppointmentCommand, an abstract class which encapsulates
operations which require selecting appointments from an appointment list.
The logical flow of using this command is shown in the activity diagram given below.
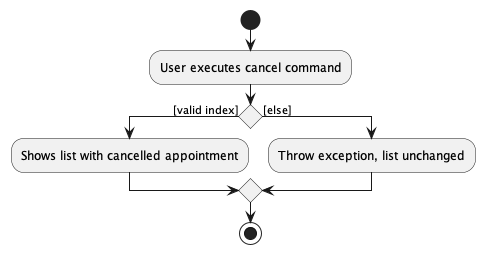
The AddressBookParser will first check for the cancel command word. The cancel command
is facilitated by the CancelCommandParser and CancelCommand classes. The CancelCommandParser
parses the user input and obtains the index inputted by the user, before creating the cancel command to
execute the deletion of the appointment from the current appointment list.
Given below is an overview of how the cancel command executes the deletion of an appointment to delete the first appointment (index 1) in the appointment list:
Design considerations
Aspect: How we decided to choose the user command:
-
Alternative 1 (current choice): Select an appointment index from appointment list
- Pros: More convenient for the end user to just choose the indexed appointment from the current appointment list.
- Cons: The details of a patient’s appointments will not be shown under the patient’s details in the patient’s list.
-
Alternative 2: Use both patient and appointment index to select an appointment to delete.
itself.
- Pros: Intuitive if the user just wants to delete a specified patient’s appointments.
- Cons: Appointments will have to be shown under tha patient list which will clutter up the UI.
Our team decided to change the user input format of the cancel command from cancel PATIENT_INDEX APPOINTMENT_INDEX
to cancel APPOINTMENT_INDEX, so it is faster for
the user to key in, and also more similar to the other commands with only 1 index.
Hide Feature
- The
hide patientscommand hides patients based on at least 1 tag or name given. If more than 1 tag or name is given, then any patients that match that tag or name will be hidden. For example,hide patients t/nose t/earwill hide all patients that has either a nose or ear tag. - The
hide apptscommand works in exactly the same way, but the conditions are the reason, tag, and status of the appointment. For example,hide appts s/markedwill hide all appointments that are marked.
Implementation
The key idea of hide and other organisational commands is to allow users to successively filter out patients,
so that they can operate on a small list that they are interested in. For example, hide patients n/Alex and then
followed by hide patients t/ear should apply both hide commands successively, each time hide is applied on the current
shown list instead of the entire patient list.
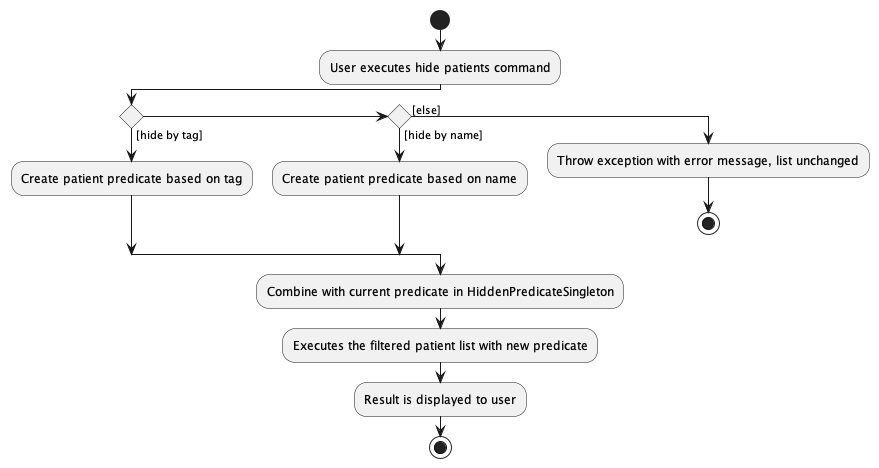
To implement this, and to ensure that hide works well with other organisational features such as find and unhide, we maintain an overarching HiddenPredicateSingleton which captures the state of the current patient and appointment list. This singleton serves as a global predicate which is updated every time an organisational command is entered.
Each time the command is executed, the current patient/appointment predicate will be combined with (AND operation)
a predicate that is the complement of the given condition, since entries that satisfy the model predicate will be shown
, and thus to hide we will have to apply a NOT operation to the given condition e.g hide patients t/ear means we should
combine the current patient list predicate with a predicate that will fail if the patient tag contains ear.
The activity diagram below will illustrate a hide patient process. A similar process applies for hide appointment.
Design considerations
Aspect: How hide patient/appointment executes:
- Current choice: Making use of a singleton class to capture the state of the patient/appointment list at all times.
- A singleton pattern is used here, because we only should have a single instance of HiddenPredicate to act as a global variable that holds the state of the current list shown to the user. If more than one object is created by mistake, there is a risk that our organisational commands no longer work correctly, as the same global predicate must be shared among all organisational commands such as find/group/hide/unhide.
Aspect: Whether hide should hide by any match or all match
-
Current choice: Making hide any match, meaning patients/appts that match any of the keywords will be hidden.
E.g:
hide appts s/unmarked t/earwill hide all appointments that is either unmarked OR has a ear tag. -
Alternative: Making hide all match meaning
hide appts s/unmarked t/earonly hides appointments that satisfy both the status and tag conditions. - We decided to go with any match so that it is easier for users if they want to hide many types of entries at one go, as opposed to all match since the user will have to key in hide many times successively.
Aspect: How hide patients should affect appointment list
-
Current choice: Hiding patients will also hide their appointments, and unhiding patients will also unhide their appointments
Explanation: We decided on this implementation because hiding a patient would imply that the user has no interest in this patient, and thus the appointments of the patient are also hidden so that the user can focus on other patients that he did not hide. Similarly, unhiding a patient implies that the user has interest in the particular patient, and thus the patient’s appointments will also be shown. On the other hand, hiding and unhiding appointments does not affect the patient list as the user may only be interested in going through the appointments. -
Alternative: Hiding/Unhiding patients do not affect appointment list at all
This approach is easier to implement, as we do not have to worry about the appointment list and we only need to update the patient list. However, we wanted to make it more convenient for the user, as there is no good way to hide appointments of a particular patient if we have no interest in the patient.
Group Patient Feature
Implementation
The group mechanism implements the following operations:
- Group patients according to their tags.
The operation is exposed in the Command interface as Command#GroupPatientCommand().
Given below is an example usage scenario and how the group mechanism behaves at each step.
Step 1. The user launches the application for the first time. The idENTify will be initialized with the initial
patient list.
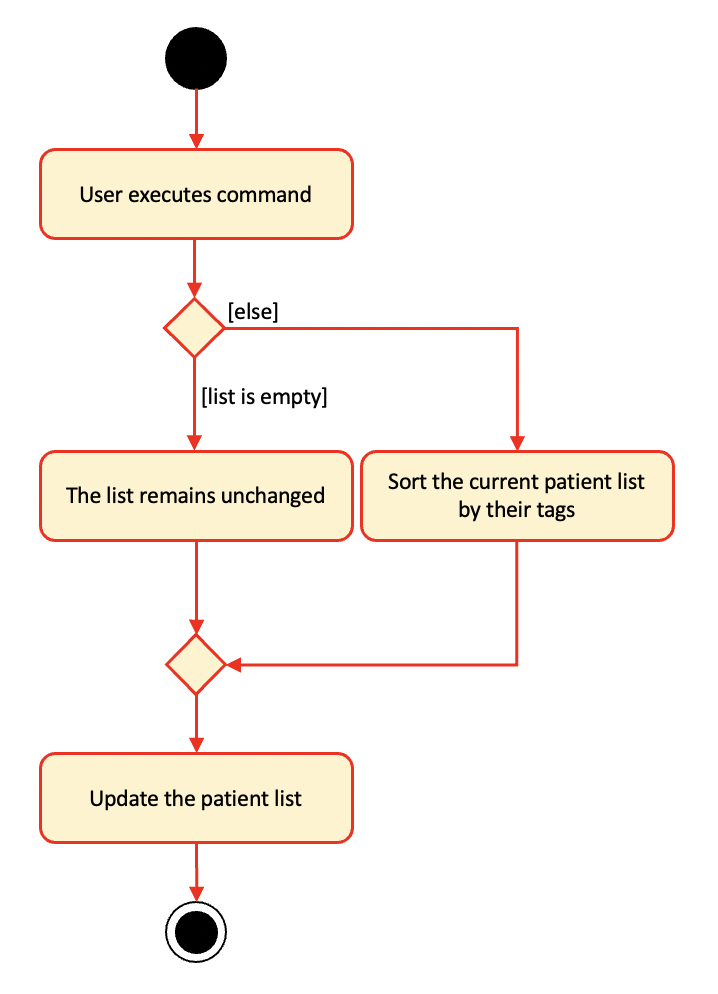
Step 2. The user executes group patients command to group patients by their tags, causing the modified list of
patients after the group patients command executes to show on the screen.
The Sequence Diagram below illustrates the interactions within the Logic component for the execute
("group patients") API call.

The following activity diagram summarizes what happens when a user executes a new command:
Design considerations
Aspect: How group patients executes:
- Current choice: Use a different comparator from default so that a heavy weight can be assigned to the value of a tag group where a patient belongs.
Group Appointment Feature
Implementation
The group mechanism implements the following operations:
- Group appointments according to their tags or patient.
The operation is exposed in the Command interface as Command#GroupAppointmentCommand().
Given below is an example usage scenario and how the group mechanism behaves at each step.
Step 1. The user launches the application for the first time. The idENTify will be initialized with the initial
appointment list.
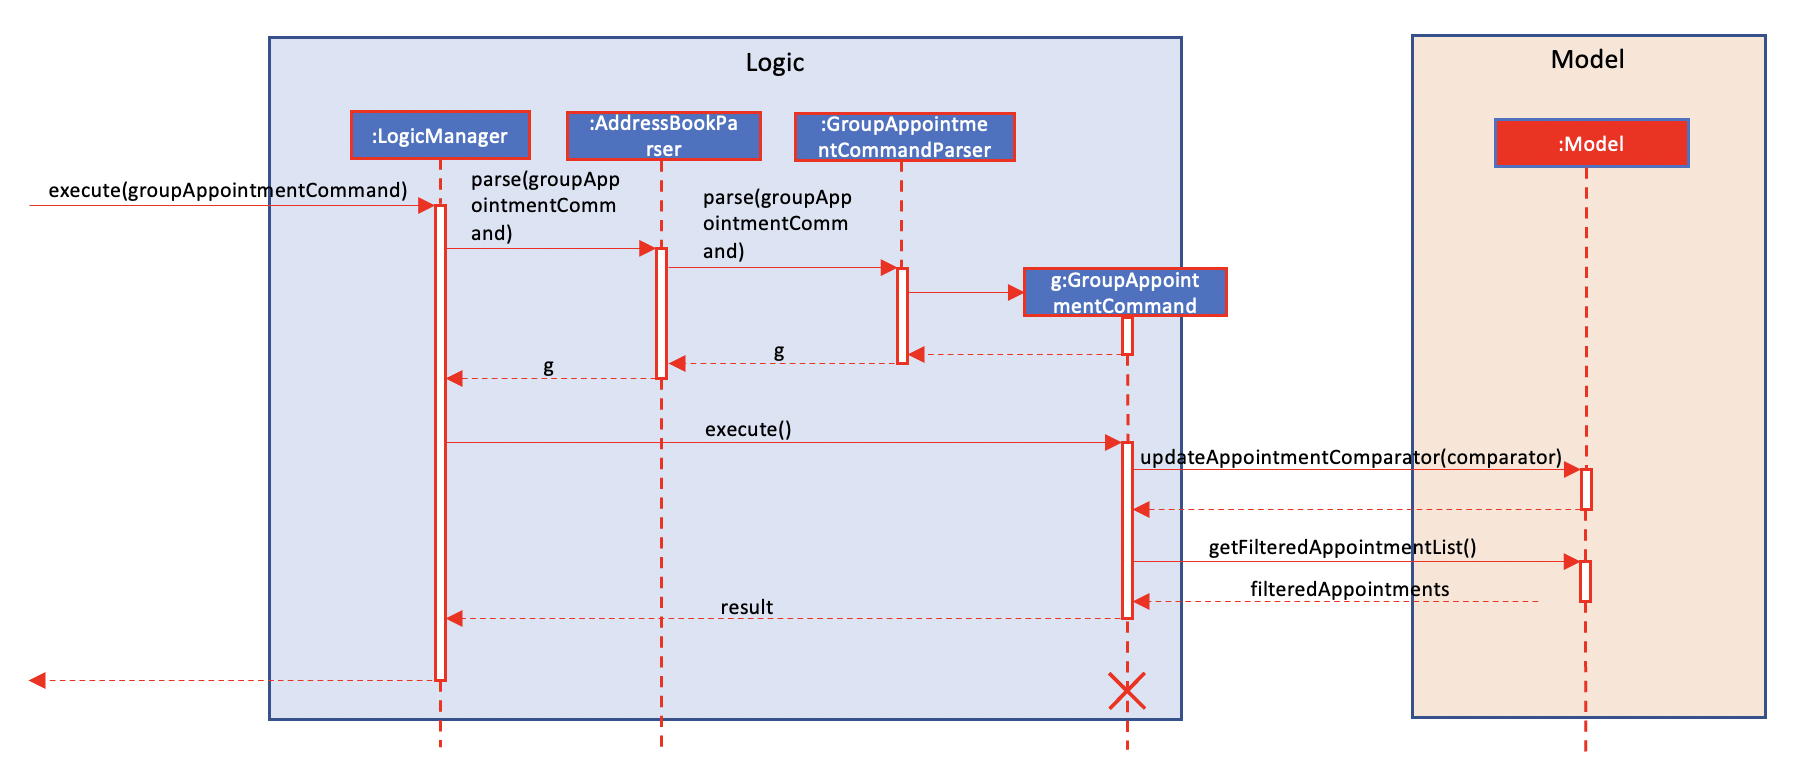
Step 2. The user executes group appts k/KEY command to group appointments by their tags (k/tag) or patient (k/patient),
causing the modified list of appointments after the group appts k/KEY command executes to show on the screen.
The Sequence Diagram below illustrates the interactions within the Logic component for the execute("group appts k/KEY") API call.
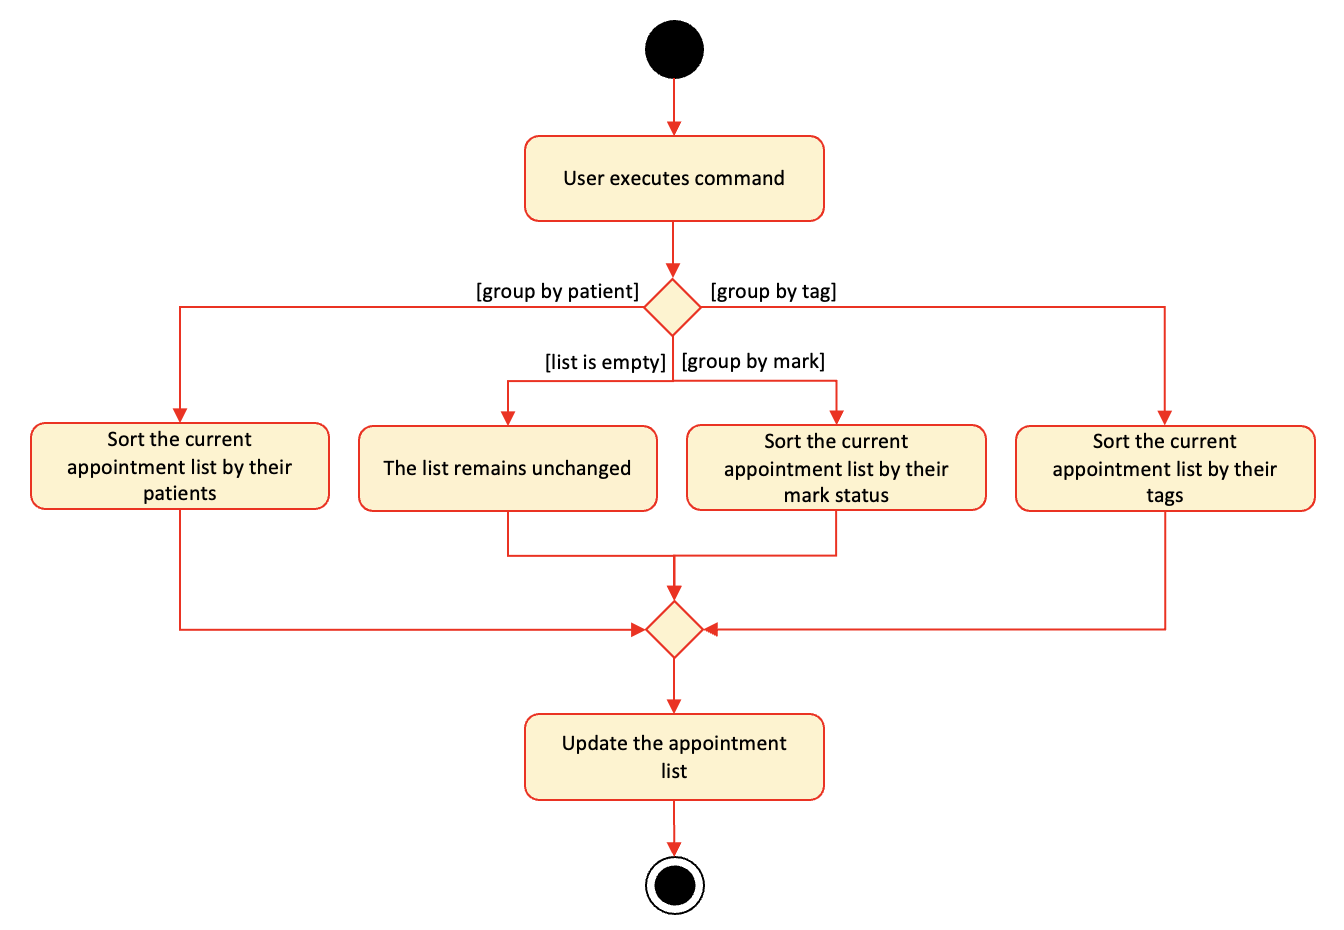
The following activity diagram summarizes what happens when a user executes a new command:
Design considerations
Aspect: How group appointments executes:
- Current choice: Use a different comparator from default so that a heavy weight can be assigned to the value of a tag group where a patient belongs or the patient attached to the appointment.
Ungroup Feature
Implementation
The ungroup mechanism implements the following operations:
- Either ungroup appointments or ungroup patients.
The operation is exposed in the Command interface as Command#UngroupCommand().
Given below is an example usage scenario and how the group mechanism behaves at each step.
Step 1. The user launches the application for the first time. The idENTify will be initialized with the initial
patient and appointment list.
Step 2. The user executes group appts k/KEY command to group appointments by their tags (k/tag) or patient (k/patient),
causing the modified list of appointments after the group appts k/KEY command executes to show on
the screen or executes group patients command to group patients by their tags, causing the modified list of
patients after the group patients command executes to show on the screen.
Step 3. The user executes ungroup appts command to ungroup appointments or ungroup patients command to ungroup
patients.
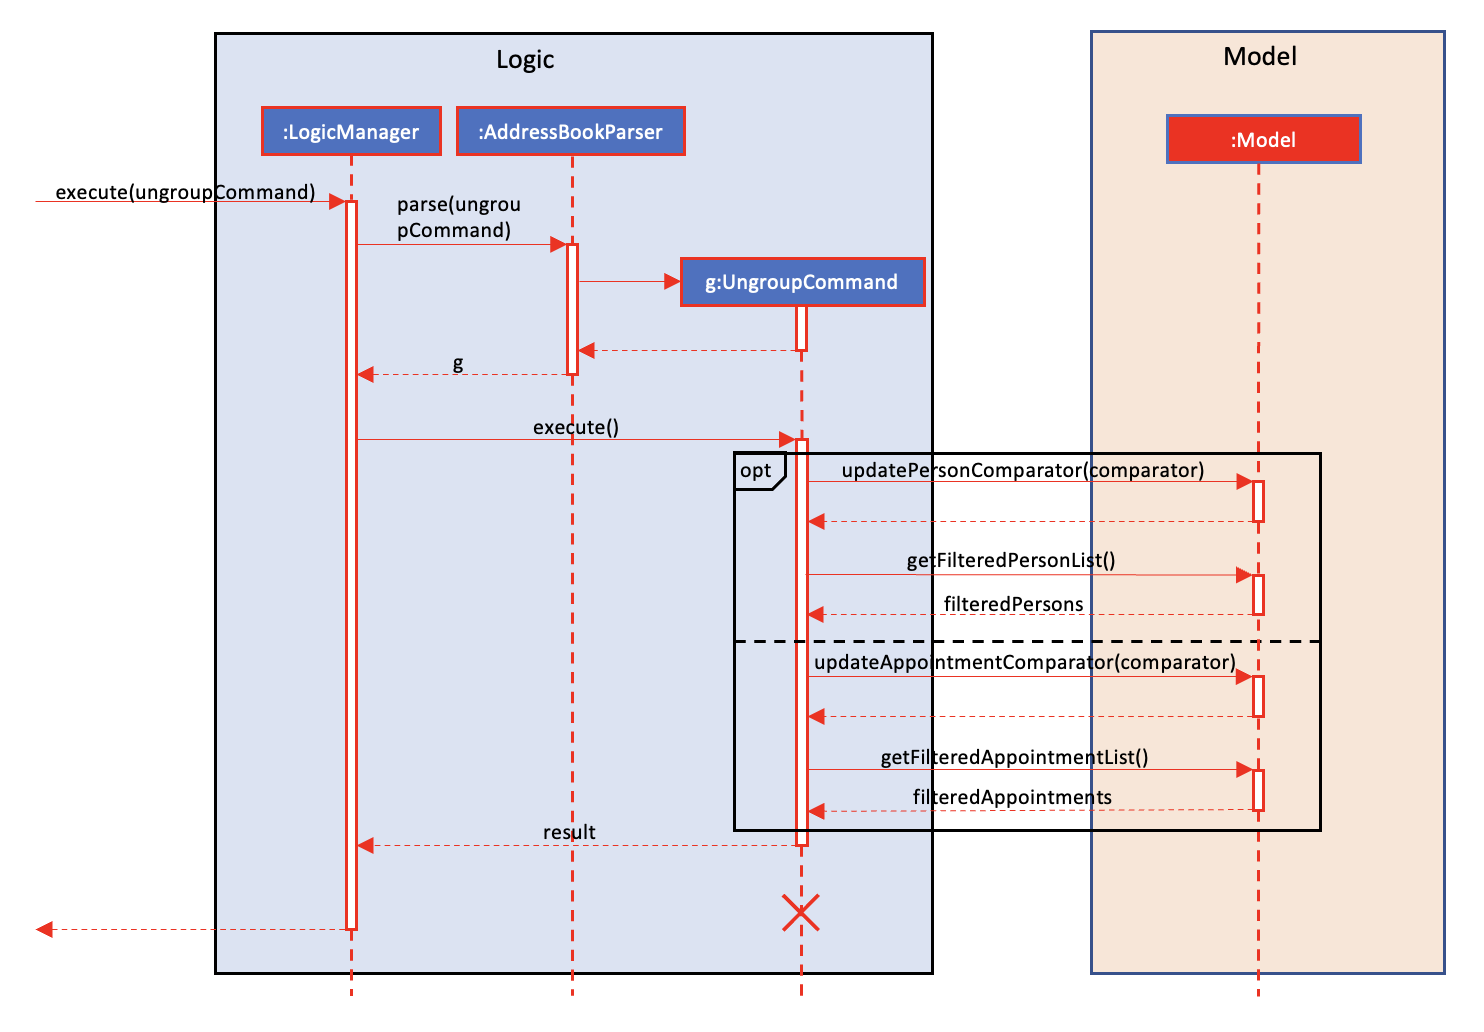
The Sequence Diagram below illustrates the interactions within the Logic component for the execute
("ungroup") API call.
The following activity diagram summarizes what happens when a user executes a new command:

Design considerations
Aspect: How ungroup executes:
- Current choice: Use the default comparator for appointments or patients so that the specified list will sort as default settings. To be more specific, the patient list will be sorted by patients’ names and the appointemnt list will be sorted by datetime.
Book Feature
Implementation
The AddressBookParser class checks for the book command word. The book mechanism is facilitated by the BookCommandParser and BookCommand classes. The BookCommandParser implements the Parser interface and takes in the user input and parses it into an index and 4 string values. The 4 string values are obtained from the ArgumentMultimap that checks whether the user has inputted the 4 prefixes supported by this feature.
The prefixes are:
-
r/for reason -
d/for dateTime -
pe/for recurring time period (optional) -
t/for tags (optional)
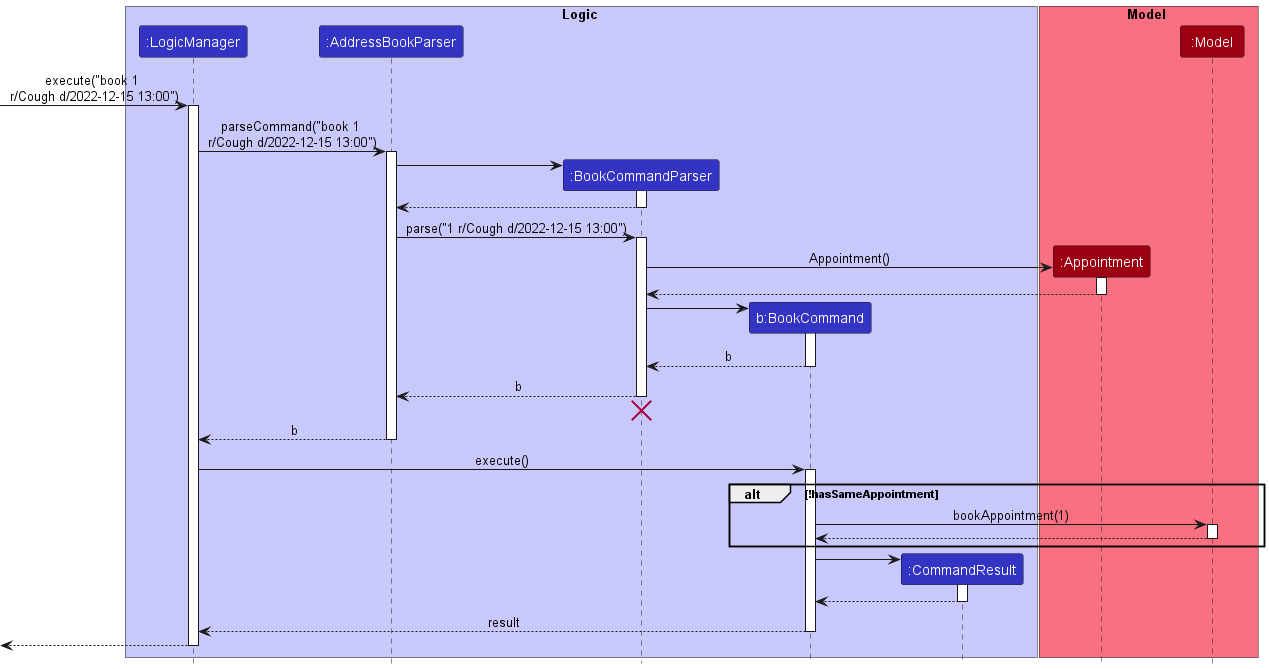
After retrieving the string values, the BookCommandParser executes the ParserUtil#ParseAppointment() to use these values to create an Appointment object. A BookCommand object will then be created with the given index and Appointment object. The BookCommand object will retrieve the specified person in the UniquePersonList and adds the Appointment object to the person’s list of appointments.
The newly added Appointment object will also be saved in the JSON file through the usage of a Jackson-friendly class JsonAdaptedAppointment.
Given below are some example usage scenarios and how the book feature behaves in each scenario.
Scenario 1: User inputs book 1 r/Sore Throat d/2022-12-10 12:00.
The ParserUtil#ParseAppointment() will detect that both the given reason and date are valid, and creates an appointment object to be stored in the specified Person, only if the Person does not have an existing appointment at that date(Scenario 6).
Scenario 2: User inputs an empty reason in the r/ prefix.
The ParserUtil#ParseAppointment() will detect that the given reason is empty and throws a ParseException, which will feedback to the user that he has given an invalid reason.
Scenario 3: User inputs an invalid dateTime in the d/ prefix, such as 2022-15-10 14:00.
The ParserUtil#ParseAppointment() will detect that the given dateTime is invalid and throws a ParseException, which will feedback to the user that he has given an invalid dateTime.
Scenario 4: User inputs an invalid recurring time period in the pe/ prefix, such as 1S.
The ParserUtil#ParseAppointment() will detect that the given time period is invalid and throws a ParseException, which will feedback to the user that he has given an invalid time period.
Scenario 5: User inputs an invalid tag in the t/ prefix, such as Sick.
The ParserUtil#ParseAppointment() will detect that the given tag is invalid and throws a ParseException, which will feedback to the user that he has given an invalid tag.
Scenario 6: User tries to book an appointment with the same time as other appointments of the same person.
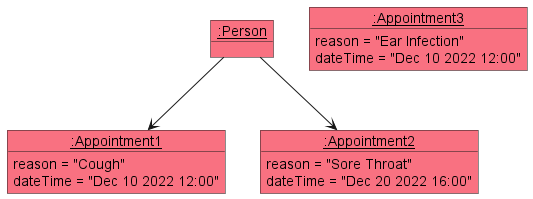
This object diagram illustrates the above scenario. As the specified person has already booked an appointment in Dec 10 2022 12:00, the newly created Appointment object will not be associated with the person. The BookCommand will throw a CommandException, which will feedback to the user that he tried to book an appointment at the same time as the other appointments.
The following sequence diagram helps to provide a clearer picture to how the book operation works:
The following Class diagram shows how serializing Appointment objects into JSON format is done.
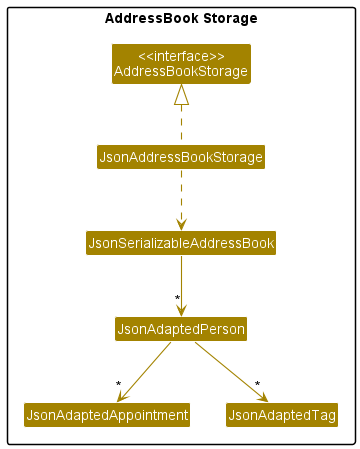
Appointment objects are mapped to JsonAdaptedAppointment objects, so that they contain only relevant fields to store and works easier with Jackson.
These objects are stored in a list field of the JsonAdaptedPerson and are stored together in a single JSON file, for easier retrival and assignment when starting up the application.
Design Considerations
Aspect: Where to assign Appointment objects:
-
Alternative 1 (current implementation): Each person stores his own list of appointments, as well as the
UniqueAppointmentListclass storing the same objects.- Pros: Easier to keep track of which appointments are associated to which person for other appointment related features.
- Cons: Must ensure both the person’s appointments and
UniqueAppointmentListappointments are equal, in edit/cancel/delete features.
-
Alternative 2:
Appointmentobjects are stored only in theUniqueAppointmentListclass.- Pros: Easier to maintain as there’s only one appointment object.
- Cons: Harder and more costly to track of each person’s appointments, especially if the person himself is edited or deleted in the process.
Edit Appointment Feature
Implementation
The AddressBookParser class checks for the edit command word and the appts descriptor word to begin. The edit appointment mechanism is facilitated by the EditAppointmentCommandParser, EditAppointmentCommand classes and EditAppointmentDescriptor inner class. The EditAppointmentCommandParser implements the Parser interface and takes in the user input and parses it into an index and up to 4 string values. The string values are obtained from the ArgumentMultimap that checks whether the user has inputted any of the 4 prefixes supported by this feature.
The prefixes are:
-
r/for reason -
d/for dateTime -
pe/for recurring time period -
t/for tags
The logical flow of using this command is shown in the activity diagram given below.
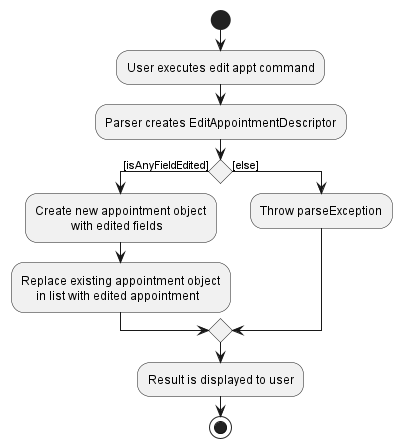
If any of the prefixes contain invalid values or no prefix values were provided, a ParseException will be thrown. Else, a new Appointment will be created with the changes and replaces the specified Appointment object to be edited in both the Person list of appointments and the UniqueAppointmentList.
Design Considerations
Aspect: How to edit the appointment objects:
-
Alternative 1 (current implementation): Follow the
EditPersonDescriptorinner class and implement aEditAppointmentDescriptorinner class.- Pros: Easier to follow existing systems and edit the appointment the same way as the
edit patientscommand. - Cons: Existing
Appointmentobject is no longer used, using memory until garbage collected.
- Pros: Easier to follow existing systems and edit the appointment the same way as the
-
Alternative 2: Edit the existing
Appointmentobject itself.- Pros: Only have to edit the required fields.
- Cons: Editing the existing object does not reflect the changes in the Appointment listview as compared to setting a new object, hence requiring more Observable fields.
Mark/Unmark Feature
Implementation
The parameters involved in the mark/unmark commands is the same as that of the cancel command.
All 3 commands take in a single parameter denoting the desired appointment number to modify.
As such, the mark/unmark commands also extend the SelectAppointmentCommand class, and are parsed similarly as well -
firstly through the AddressBookParser to identify the inputted command as a mark/unmark command,
then followed by a second parse in MarkCommandParser/UnmarkCommandParser to create a MarkCommand/UnmarkCommand object,
which is then executed to mark/unmark the target appointment.
However, the mark command comes with an additional step during the execute method.
It checks if an appointment is recurring, and adds a future unmarked appointment at the designated date if needed.
Given below is an example usage scenario, where the user enters mark 1 as the input,
and how the mark mechanism behaves at each step.
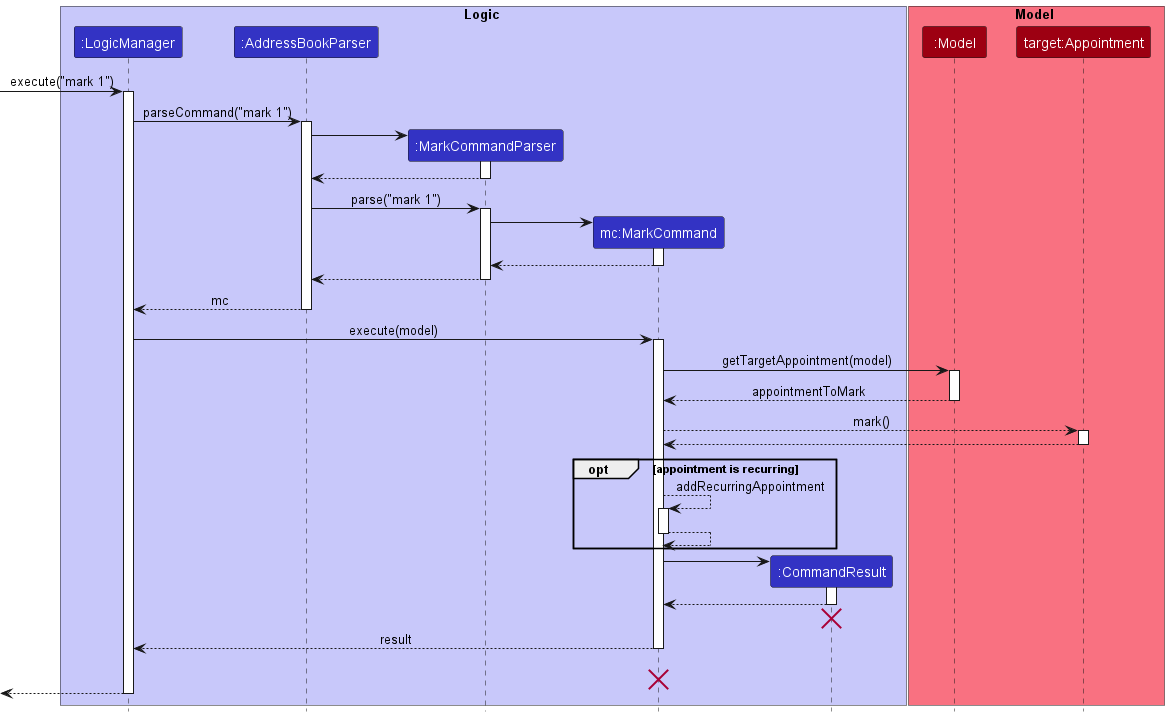
The unmark sequence diagram is identical to the mark sequence diagram but lacks the opt frame.
It also contains the UnmarkCommandParser and UnmarkCommand classes in place of MarkCommandParser and MarkCommand respectively.
Design considerations
Aspect: How mark & unmark executes:
-
Alternative 1 (current choice):
MarkCommandandUnmarkCommandtakes in anIndexdenoting the appointment to mark/unmark.- Pros: Easy to implement.
- Cons: Will have to compute the actual appointment to mark
MarkCommand/UnmarkCommanditself.
-
Alternative 2:
MarkCommandandUnmarkCommandtakes in theAppointmentto be marked as a parameter in its constructor directly- Pros: Cohesiveness is increased, as it only needs to concern itself with marking/unmarking the appointment.
- Cons: The
CommandResultobject generated at the end of the command will not have theIndexof the appointment recorded in it. This makes it harder to debug usingCommandResultwhen bugs occur.
Find Feature
Implementation
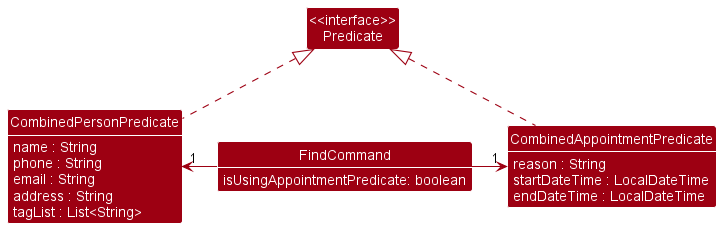
The find command takes in 2 predicates CombinedPersonPredicate, CombinedAppointmentPredicate and a boolean isAppointmentPredicateUsed.
-
CombinedPersonPredicatestores all person related search strings and tests for all patients that satisfies all the search terms. -
CombinedAppointmentPredicatestores all appointment related search fields and tests for all appointments that satisfies all the search terms. -
isAppointmentPredicateUsedtracks if there are any appointment related search terms are specified by the user.
These 3 fields are generated and supplied by the FindCommandParser, which takes in the user inputs during a find command,
and sorts the input into the 2 predicate classes accordingly as shown in the diagram above,
in addition to also producing the value of isAppointmentPredicateUsed.
To facilitate the idea of returning only relevant results to the user, the execute() method of FindCommand follows a 3-step process.
-
personFulfillingBothPredicates, the predicate to display all patients that satisfy theCombinedPersonPredicateis generated first. IfisAppointmentPredicateUsedistrue, the predicate is also modified to check if the patient has at least 1 appointment that satisfies theCombinedAppointmentPredicate. As such, theisAppointmentPredicateUsedfield ensures that patients with no appointments are still displayed when a user inputs only patient related search parameters. -
appointmentFulfillingBothPredicatesis generated next. It is a predicate that displays all appointments that satisfy theCombinedAppointmentPredicatewith a patient owner that satisfies thepersonFufillingBothPredicatespredicated generated in step 1. - To display only results in the current patient and appointment lists shown to the user that satisfies all the search terms, The 2 predicates generated in step 1 and 2 are combined with the current active predicate in the model.
The logical flow of this command is summarised in the activity diagram below.
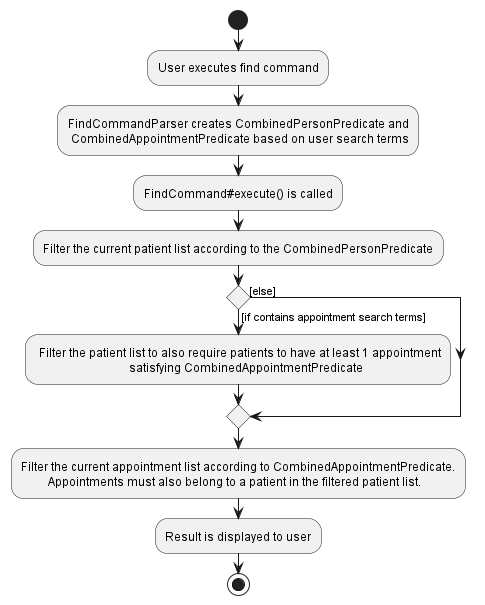
Ultimately, this ensures that for an entry to be displayed:
- A patient must satisfy all patient search terms and have at least 1 appointment that satisfies all the appointment search terms, if provided.
- An appointment must satisfy all appointment search terms and belong to a patient that satisfies all the patient search terms.
- The entry must also exist in the list prior to the execution of the find command.
Design considerations
Aspect: How to pass in search terms to FindCommand:
-
Alternative 1: Store all search terms in
FindCommandand usePredicate#andto combine the the search predicates.- Pros: Easy and quick to implement. No extra classes needed.
- Cons: Low testability of
FindCommand. There is no way to override thePredicate#equals(), so we will be unable to check if twoPredicates have the same search parameters.
-
Alternative 2: Create 1 class for each search term
(E.g
NameContainsSequencePredicate,AppointmentContainsReasonPredicateetc.). Create aCombinedPersonPredicateand aCombinedAppointmentPredicatethat takes in all these ‘lesser’ predicates and combine them to form the actual predicate to filter the list with. All these classes will be subclasses ofPredicate.- Pros:
- Very high testability of
FindCommand, as we can now overrideequals(). - Having separate
CombinedPersonPredicateandCombinedAppointmentPredicateclasses would also allow patients and appointments to be tested separately, enhancing cohesion and decreasing coupling through the Separation of Concerns principle.
- Very high testability of
- Cons:
- Large amount of classes needed. There would also be the issue of excessive duplication of code.
- Time-consuming to add in potential new predicates in the future as much more test cases would be needed to test each individual class.
- Pros:
-
Alternative 3 (current choice): Keep the
CombinedPersonPredicateandCombinedAppointmentPredicate, and store the relevant search terms into each predicate. Combine those search terms in the predicate class itself.- Pros:
- High testability of
FindCommand. - Extending the method features in the future would be more convenient than alternative 2.
- The benefit of being able to separately test patients and appointments as mentioned in alternative 2 is preserved.
- High testability of
- Cons: Slightly less testable than alternative 2. However, the increased efficiency is worth the tradeoff.
- Pros:
Documentation, logging, testing, configuration, dev-ops
Appendix: Requirements
Product scope
Target User Profile:
- Tech savvy admin staff in Ear, Nose, Throat (ENT) department
- Has a need to manage a significant number of patients/appointments
- Prefer desktop apps over other types
- Can type fast
- Prefer typing to mouse interactions
- Is reasonably comfortable using Command-Line Interface (CLI) apps
Value proposition:
- ENT doctors treat patients who often have chronic conditions and our product will make it easier for the staff to keep track of these patients, such as their appointment dates, the completion status of these appointments, the type of appointment etc
- ENT department offers a lot of services including head & neck surgery, voice clinic, and otology / skull base, etc; therefore, they need this app to filter different types of patients
User stories
Priorities: High (must have) - * * *, Medium (nice to have) - * *, Low (unlikely to have) - *
| Priority | As a … | I want to … | So that I can… |
|---|---|---|---|
* * * |
starting user | view a help screen | understand how this application works |
* * * |
user | search some patients by keywords | find specific patients and information faster |
* * * |
user | search some appointment by keywords | find specific appointments and information faster |
* * * |
user | add a contact of the patient | keep track of the patient’s contact details |
* * * |
user | delete a contact of the patient | remove the patient from my contacts when no longer needed |
* * * |
user | book an appointment for the patient | schedule the patient to meet the doctor |
* * * |
user | cancel an appointment for the patient | ensure that the appointment schedule is updated and accurate |
* * * |
user | save the data of my contacts when I exit the app | not lose the contacts when I open the app again |
* * |
clumsy user | edit information about a patient | merge and keep his information up to date |
* * |
clumsy user | edit an existing appointment | fix my error in setting their appointment details |
* * * |
user | mark an appointment as done | know that the patient has already visited |
* * |
user | unmark an appointment as not done | change my appointment state without deleting and adding the appointment again |
* |
user | sort my patients by their names | look up their information faster |
* |
user | sort my appointments by their datetime | arrange appointments more efficiently |
* |
user | group my patients by their tags | check patients’ problems more easily |
* |
user | group my appointments by some keys | view and arrange appointments in one go |
* |
user | ungroup my patients | view the original patient list |
* |
user | ungroup my appointments | view the original appointment list |
* |
user | hide my patients by some conditions | concentrate on other patients not satisfying the conditions |
* |
user | hide my appointments by some conditions | deal with appointments that do not satisfy the conditions better |
* |
user | unhide my patients | view hidden patients and their appointments to work with |
* |
user | unhide my appointments | view hidden appointments to work with |
* |
lazy user | view my previous commands | avoid repeating to input the same or similar commands over and over again |
Use cases
(For all use cases below, the System is idENTify and the Actor is the user, unless specified otherwise)
Use Case: UC01 - Show a list of all patients
Guarantees: A list of all patients’ contact is shown.
MSS
- User requests to list all patients.
-
idENTify shows a list of all patients.
Use case ends.
Extensions
-
2a. The list is empty.
Use case ends.
Use Case: UC02 - Show a list of all appointments
Guarantees: A list of all appointments is shown.
MSS
- User requests to list all appointments.
-
idENTify shows a list of all appointments.
Use case ends.
Extensions
-
2a. The list is empty.
Use case ends.
Use Case: UC03 - Add a Patient
Guarantees: A patient contact is added into idENTify.
MSS
- User adds the patient by entering the command and the patient details.
-
idENTify adds the patient.
Use case ends.
Extensions
- 1a. idENTify detects an error in the entered data.
- 1a1. idENTify shows an error message.
- 1a2. User enters new data.
-
Steps 1a1-1a2 are repeated until the data entered are correct.
Use case resumes at step 2.
Use Case: UC04 - Book an appointment
Guarantees: An appointment is booked for the patient only if the data entered are correct.
MSS
- User gets the list of patients(UC01).
- User requests to book an appointment for a specified patient.
-
idENTify shows that an appointment has been booked for that patient.
Use case ends.
Extensions
- 2a. idENTify detects an error in the entered data.
- 2a1. idENTify shows an error message.
- 2a2. User enters new data.
-
Steps 2a1-2a2 are repeated until the data entered are correct.
Use case resumes at step 3.
Use Case: UC05 - Delete a patient
Guarantees: The patient will be deleted from the patient list only if the data entered are correct.
MSS
- User gets the list of patients(UC01).
- User requests to delete a specific patient in the list.
-
idENTify deletes the patient.
Use case ends.
Extensions
- 2a. idENTify detects an error in the entered data.
- 2a1. idENTify shows an error message.
- 2a2. User enters new data.
-
Steps 2a1-2a2 are repeated until the data entered are correct.
Use case resumes at step 3.
Use Case: UC06 - Cancel an appointment
Guarantees: The appointment will be deleted from the appointment list only if the data entered are correct.
MSS
- User gets the list of appointments(UC02).
- User requests to cancel a specific appointment in the list.
-
idENTify shows that the appointment has been cancelled.
Use case ends.
Extensions
- 2a. idENTify detects an error in the entered data.
- 2a1. idENTify shows an error message.
- 2a2. User enters new data.
-
Steps 2a1-2a2 are repeated until the data entered are correct.
Use case resumes at step 3.
Use Case: UC07 - Find a patient
Guarantees: A list of patients that matches the given query if applicable.
- User requests to find a patient.
-
idENTify shows a list of patients that matches the given query.
Use case ends.
Extensions
-
2a. The list is empty.
Use case ends.
Use Case: UC08 - Find an appointment
Guarantees: A list of appointments that matches the given query if applicable.
- User requests to find an appointment.
-
idENTify shows a list of appointments that matches the given query.
Use case ends.
Extensions
-
2a. The list is empty.
Use case ends.
Use Case: UC09 - Mark an appointment
Guarantees: The appointment will be marked as done only if the data entered are correct.
MSS
- User gets the list of appointments(UC02).
- User requests to mark a specified appointment for a specified patient.
-
idENTify marks the selected appointment.
Use case ends.
Extensions
- 2a. idENTify detects an error in the entered data.
- 2a1. idENTify shows an error message.
- 2a2. User enters new data.
-
Steps 2a1-2a2 are repeated until the data entered are correct.
Use case resumes at step 3.
Use Case: UC10 - Unmark an appointment
Guarantees: The appointment will be unmarked as not done only if the data entered are correct.
MSS
- User gets the list of appointments(UC02).
- User requests to unmark a specified appointment for a specified patient.
-
idENTify unmarks the selected appointment.
Use case ends.
Extensions
- 2a. idENTify detects an error in the entered data.
- 2a1. idENTify shows an error message.
- 2a2. User enters new data.
-
Steps 2a1-2a2 are repeated until the data entered are correct.
Use case resumes at step 3.
Use Case: UC11 - Edit a patient
Guarantees: The patient’s contact will have its fields edited only if the data entered are correct.
MSS
- User gets the list of patients(UC01).
- User requests to edit a specified patient details.
-
idENTify edits the selected patient contact.
Use case ends.
Extensions
- 2a. idENTify detects an error in the entered data.
- 2a1. idENTify shows an error message.
- 2a2. User enters new data.
-
Steps 2a1-2a2 are repeated until the data entered are correct.
Use case resumes at step 3.
Use Case: UC12 - Edit an appointment
Guarantees: The appointment will have its fields edited only if the data entered are correct.
MSS
- User gets the list of appointments(UC03).
- User requests to edit a specified appointment for a specified patient.
-
idENTify edits the selected appointment.
Use case ends.
Extensions
- 2a. idENTify detects an error in the entered data.
- 2a1. idENTify shows an error message.
- 2a2. User enters new data.
-
Steps 2a1-2a2 are repeated until the data entered are correct.
Use case resumes at step 3.
Use Case: UC13 - Sort the patient list
Guarantees: The patient list will be sorted in ascending order.
MSS
- User gets the list of patients(UC01).
-
idENTify displays the patient list sorted by their names.
Use case ends.
Extensions
- 2a. idENTify detects multiple patients with the same name.
- 2a1. idENTify compares their other information.
- 2a2. idENTify sort them by their other information.
-
2a3. idENTify displays the sorted patient list.
Use case ends.
Use Case: UC14 - Sort the appointment list
Guarantees: The appointment list will be sorted in ascending order.
MSS
- User gets the list of appointments(UC02).
-
idENTify displays the appointment list sorted by their datetime.
Use case ends.
Extensions
- 2a. idENTify detects multiple appointments with the same datetime.
- 2a1. idENTify compares their corresponding patients.
- 2a2. idENTify sort them by their patient information.
-
2a3. idENTify displays the sorted appointment list.
Use case ends.
Use Case: UC15 - Group patients
Guarantees: Patients will be grouped by their tags.
MSS
- User enters command to group patients.
-
idENTify displays the patient list grouped by their tags.
Use case ends.
Extensions
- 2a. idENTify detects multiple patients with the same tags.
- 2a1. idENTify compares their other information.
- 2a2. idENTify sort them by their other information.
-
2a3. idENTify displays the sorted patient list.
Use case ends.
Use Case: UC16 - Group appointments
Guarantees: Appointments will be grouped by their some criteria.
MSS
- User enters command to group appointments with some criterion.
-
idENTify displays the appointment list grouped according to the specified criterion.
Use case ends.
Extensions
- 1a. idENTify detects an error in the entered data.
- 1a1. idENTify shows an error message.
- 1a2. User enters new data.
-
Steps 1a1-1a2 are repeated until the data entered are correct.
Use case resumes at step 2.
- 2a. idENTify detects multiple appointments that should have the same order.
- 2a1. idENTify compares their other information.
- 2a2. idENTify sort them by their other information.
-
2a3. idENTify displays the sorted appointment list.
Use case ends.
Use Case: UC17 - Ungroup patients
Guarantees: The patient list will be the same as before grouping.
MSS
- User enters command to ungroup patients.
-
idENTify displays the patient list sorted by default(UC13).
Use case ends.
Use Case: UC18 - Ungroup appointments
Guarantees: The appointment list will be the same as before grouping.
MSS
- User enters command to ungroup appointments.
-
idENTify displays the appointment list sorted by default(UC14).
Use case ends.
Use Case: UC19 - Hide patients
Guarantees: Patients satisfying given conditions will not be shown.
MSS
- User enters command to hide patients with specified conditions.
-
idENTify updates the patient and appointment list to exclude hidden patients.
Use case ends.
Extensions
- 1a. idENTify detects an error in the entered data.
- 1a1. idENTify shows an error message.
- 1a2. User enters new data.
-
Steps 1a1-1a2 are repeated until the data entered are correct.
Use case resumes at step 2.
Use Case: UC20 - Hide appointments
Guarantees: Appointments satisfying given conditions will not be shown.
MSS
- User enters command to hide appointments with specified conditions.
-
idENTify updates the appointment list to exclude hidden appointments.
Use case ends.
Extensions
- 1a. idENTify detects an error in the entered data.
- 1a1. idENTify shows an error message.
- 1a2. User enters new data.
-
Steps 1a1-1a2 are repeated until the data entered are correct.
Use case resumes at step 2.
Use Case: UC21 - Unhide patients
Guarantees: The patient list will be the same as before hiding.
MSS
- User enters command to unhide patients.
-
idENTify updates the patient and appointment list to include unhidden patients.
Use case ends.
Use Case: UC22 - Unhide appointments
Guarantees: The appointment list will be the same as before hiding.
MSS
- User enters command to unhide appointments.
-
idENTify updates the appointment list to include unhidden appointments.
Use case ends.
Use Case: UC23 - Clear entries
Guarantees: All entries will be cleared.
MSS
- User enters command to clear all entries of current patient and appointment lists.
-
idENTify displays an empty patient list and an empty appointment list.
Use case ends.
Use Case: UC24 - Show help page
Guarantees: A help page will be provided.
MSS
- User enters command to ask for help about how to use the app.
-
idENTify shows a page including some information to help users.
Use case ends.
Use Case: UC25 - Show command history
MSS
- User enters key to view previous commands.
-
idENTify shows previous commands to users.
Use case ends.
Use Case: UC26 - Exit the app
MSS
- User enters command to exit.
-
idENTify saves current data and exits.
Use case ends.
Non-Functional Requirements
- Should work on Windows, Linux, OS-X Operating System (OS) as long as it has Java 11.
- Should be able to hold up to 1000 persons without a noticeable sluggishness in performance for typical usage.
- A user with above average typing speed for regular English text should be able to accomplish most of the tasks faster using commands than using the mouse.
- Should not be used with offensive language.
- Expected to adhere to a schedule that delivers a feature set every one month.
- Should respond to each command at most 1 second long.
- Not required to make calls to contacts.
- Should be able to store data locally in a human editable text file.
- Should not use Database Management System to store data.
- Product should be a result of evolving the given code base.
- Should be for a single user.
- Should be able to be used at any time (even beyond this semester)
- Should not exceed 100MB in size.
- Should not require external software to run.
Glossary
-
Regular English text: Basic text that is keyed in by a user. Not code or not system admin commands.
- Operating System (OS): The low-level software that supports a computer’s basic functions, common ones include Windows, macOS, Linux.
- Search string: The text that a user uses to find a specific patient (such as a part of the patient’s name).
- Command-Line Interface (CLI): A text-based user interface (UI) used to run programs, manage computer files and interact with the computer.
- Graphical User Interface (GUI): A graphics-based operating system interface that uses icons, menus and a mouse (to click on the icon or pull down the menus) to manage interaction with the system.
- Main Success Scenario (MSS): Describes the most straightforward interaction for a given use case, which assumes that nothing goes wrong.
- Actor: A role played by a user. An actor can be a human or another system. Actors are not part of the system; they reside outside the system.
- Backward compatible: Refers to a hardware or software system that can use the interface of an older version of the same product.
- Store data locally: Allow the required data to be stored in a file in the user’s computer.
- Database Management Systems (DBMS): Software systems used to store, retrieve, and run queries on data. A DBMS serves as an interface between an end-user and a database, allowing users to create, read, update, and delete data in the database.
Appendix: Instructions for manual testing
Given below are instructions to test the app manually. It is recommended to follow the steps and sections in order.
Launch and shutdown
-
Initial launch
-
Download the jar file and copy into an empty folder
-
Double-click the jar file Expected: Shows the GUI with a set of sample patient and appointment information. The window size may not be optimum.
-
-
Saving window preferences
-
Resize the window to an optimum size. Move the window to a different location. Close the window.
-
Re-launch the app by double-clicking the jar file.
Expected: The most recent window size and location is retained.
-
Adding a patient
- Test case:
add n/John Doe p/12345678- Expected results:
- An acknowledgement message regarding the added patient appears.
- A new entry appears in the patient list with the name
John Doe, phone number12345678and 0 upcoming appointments.
- Expected results:
- Test case:
add n/John- Expected results:
- An invalid command format error message appears.
- No new entries are added.
- Expected results:
Deleting a patient
Section Prerequisites: Completed all the steps in the previous section Adding a patient.
- Test case:
delete 6It should be a patient without any upcoming appointments.- Expected results:
- An acknowledgement message regarding the patient deleted appears.
- The patient should no longer appear in the patient list.
- Expected results:
- Test case:
delete 6. It should be a patient with at least 1 upcoming appointment.- Expected results:
- Similar to previous
- Additionally, there should be no more appointments belonging to the patient in the appointment list.
- Expected results:
- Test case:
delete 0- Expected results:
- An invalid command format error message appears.
- No entries in the patient appointment lists were deleted.
- Expected results:
Booking an appointment
Section Prerequisite: Completed all the steps in the previous section Deleting a patient.
- Test case:
book 1 r/Swimmer's Ear d/2022-12-30 10:00- Expected results:
- An acknowledgement message that an appointment was booked for the target patient appears.
- A new entry with the reason
Swimmer's Ear, dateDec 30 2022 10:00and stateNon-recurringshould appear in the appointment list.
- Expected results:
- Test case:
book 2 r/Rhinitis d/2020-10-10 10:30 pe/1Y- Expected results:
- Similar to previous, but with a new appointment entry with reason
Rhinitis, date2020-10-10and stateRecurring every 1 yearshould appear instead.
- Similar to previous, but with a new appointment entry with reason
- Expected results:
- Test case
book- Expected result:
- An invalid command format error message appears.
- No new entries are added.
- Expected result:
Cancelling an appointment
Section Prerequisite: Completed all the steps in the previous section Booking an appointment.
- Test case:
cancel 1.- Expected results:
- An acknowledgement message that the target appointment was deleted appears.
- The appointment should no longer appear on the appointment list.
- Expected results:
- Test case:
cancel 9999.- Expected results:
- An invalid appointment index error message appears.
- No entries in the patient or appointment lists were deleted.
- Expected results:
Editing existing patients
Section Prerequisite: At least 1 patient exists in the patient list.
- Test case:
edit patients 1 e/test@example.com a/Blk 10 Clementi Street #12-34- Expected results:
- An acknowledgement message that the patient’s information was edited appears.
- The patient entry contains the updated email and address information.
- Expected results:
- Test case:
edit patients 1 n/Jane- Expected result: Same as previous, but contains with only the name updated. You may need to scroll down to see the updated patient entry.
- Test case:
edit- Expected results:
- A command incomplete message appears.
- No entries in the patient or appointment lists were modified.
- Expected results:
Editing existing appointments
Section Prerequisite: At least 1 appointment exists in the patient list.
- Test case:
edit appts 1 r/Sore Throat- Expected results:
- An acknowledgement message that the appointment’s information was edited appears.
- The appointment entry contains the updated reason.
- Expected results:
- Test case:
edit appts- Expected results:
- An invalid command format error message appears.
- No entries in the patient or appointment lists were modified.
- Expected results:
Marking appointments as complete
Section Prerequisite: The 2nd appointment in the appointment list should be unmarked. If the appointment is marked or missing, replace the 2 in the following commands with another appointment entry that is currently unmarked.
- Test case:
mark 2- Expected results:
- An acknowledgement message that the appointment was marked appears.
- The appointment’s mark status changes from
[]to[X].
- Expected results:
- Test case:
mark 2- Expected results:
- An error message indicated that the appointment is already marked appears.
- There is no change in the mark status of the appointment.
- Expected results:
Marking appointments as incomplete
Section Prerequisite: Completed all the steps in the previous section Marking appointments as complete.
Repeat the same test cases in the previous section, but using unmark 2 instead.
The expected results should be similar as those in the previous section, but with acknowledgment messages indicating
that the appointment was unmarked, and that the appointment’s marked status changes from [X] to [].
Listing results
Section Prerequisite: There is at least 1 entry in each of the patient and appointment lists.
-
Note: Filter the list using a find command (E.g.,
find n/test r/test) before performing any test case in this section.- Ensure that the resulting patient and appointment lists contains fewer patients and appointments prior to entering the command.
- It is fine if no results are displayed.
- Test case:
list patients- Expected results:
- An acknowledgement message that all patients are listed appears.
- The patient list displays all patients.
- The other list (appointment list in this case) should stay unchanged.
- Expected results:
- Test case:
list appts- Expected result: Same as previous, but with appointments instead.
- Test case:
list all- Expected results:
- An acknowledgement message that all patients and appointment are listed appears.
- Both patient and appointment lists displays all results.
- Expected results:
- Test case:
list- Expected results:
- A command incomplete message appears.
- Both patient and appointment lists stay unchanged.
- Expected results:
Grouping/Ungrouping results
Section Prerequisite: There are at least 2 entries in each of the patient and appointment lists with different tags attached to them.
- Test case:
group patients- Expected results:
- An acknowledgement message that all patients are grouped appears.
- Entries in the patient list with similar tags should be grouped together, with behaviour as specified in the user guide.
- Expected results:
- Test case:
ungroup patients- Expected results:
- An acknowledgement message that all patients are ungrouped appears.
- The changes to the patient list that occurred in the previous test case should be reverted.
- Expected results:
- Test case:
group appts k/tag- Expected result: Similar to test case 1, but with appointments grouped with their tags instead.
- Test case:
ungroup appts- Expected result: Similar to test case 2, but with appointments instead.
Hiding/Unhiding results
Section Prerequisite: There is a patient named Bernice with at least 1 appointment. There is also at least 1 appointment
in the appointment list with the reason Checkup.
It is recommended to have more patients and appointments so that the behaviour of this command becomes more clear.
- Note: For all test cases in this section, a message displaying the number of filtered results should appear after every valid input.
- Test case:
hide patients n/Bernice- Expected results:
- There are no more patients containing the name
Bernicein the patient list. - There are no more appointments belonging to a patient containing the name
Bernicein the appointment list.
- There are no more patients containing the name
- Expected results:
- Test case:
unhide patients n/Bernice- Expected result: The results hidden in the previous test case should reappear.
- Test case:
hide appts r/Checkup- Expected result: There are no more appointments containing the reason
Checkupin the appointment list.
- Expected result: There are no more appointments containing the reason
- Test case:
unhide appts r/Checkup- Expected result: The results hidden in the previous test case should reappear.
Finding results
Section Prerequisites: Same prerequisites as those in the previous section Hiding/Unhiding results.
Note: Enter list all after performing every test case in this section. Similarly to the previous section, a message
displaying the number of filtered results should appear after every valid input.
- Test case:
find n/Bernice- Expected results:
- Only patients containing the name
Berniceappear in the patient list. - Only appointments belonging to a patient containing the name
Berniceappear in the appointment list.
- Only patients containing the name
- Expected results:
- Test case:
find r/Checkup- Expected results:
- Only appointments containing the reason
Checkupappear in the appointment list. - Only patients with at least 1 such appointment will appear in the patient list.
- Only appointments containing the reason
- Expected results:
Dealing with save data issues
- Test Case: Dealing with missing files
- If there is no save data present, the application will open with a new data file filled with sample data
- To simulate a missing file:
- Head to the location of your save data. The location of the save data is indicated at the bottom left of the idENTify app.
- Delete the file
idENTify.json - Relaunch the app.
- Expected result: A new file will be created with some sample patients and appointments.
- Test case: Dealing with corrupted files
- If save data is corrupted, the application will open with an empty data file.
- To simulate a missing file:
- Head to the location of your save data, in the same way as the previous test case.
- Open the file
idENTify.json, and corrupt the file (E.g. Delete the very first line of theidENTify.jsonfile). - Relaunch the app.
- Expected result: A new file will be created with no patients or appointments.
Appendix: Effort
Our project was harder than Address Book Level3(AB3) because AB3 only deals with Persons, while our project includes Appointments as well. There was a huge learning curve at the start as we were very unfamiliar with what most of the classes do. After familiarizing ourselves with some of the necessary classes to implement our new enhancements, we also had a hard time writing new test cases as our new features caused the existing test cases to fail. It took a long time for us to figure out that the existing static variables used for the test cases were the problem as our new test cases involved altering the list of appointments in those variables.
In v1.2, we updated the GUI to contain 2 listviews: one for patients and one for appointments. We found out that changes to our appointment fields, such as marking them as completed, were not properly reflected on the listviews. We had to spent time researching how to use the Observer pattern(ie. Callback) to reflect such changes. We also had to differentiate similar commands by using a descriptor word(patients/appts), and spent some time learning regex in order to update the AddressBookParser’s pattern checking. As our mark, unmark, edit appts and cancel features also used the same mechanism to retrieve the specified appointment, we had to spent time refactoring our Parser classes to reduce duplication of such code.
In v1.3, we implemented our organisation features: hide, unhide, group, ungroup and find. While they all individually worked as expected, we had a hard time integrating hide/unhide/find to work well together, as these commands all deal with inserting a Predicate into the filtered list. It took some time for us to figure out how to keep track of the current Predicate in each filtered list and to add onto this Predicate while executing any hide/unhide/find command.
Overall, we are satisfied with our project given the time constraints and huge learning curve for the starting weeks. While workload is relatively high, it was an enjoyable experience to be working in a team.